

Slide the covers back on to the head and foot ends. You will notice they will only fit one way round. You may need to tap it across with a small hammer if it is stiff. If you are struggling to locate the cover in the slots of the motor body, it could be that the motor has not clicked into position on the drive bar. Simply give the motor another good yank to get it to locate and you should hear a click. Replace the slats. Plug into the power supply. Feed the hand control up through the middle slats and test.

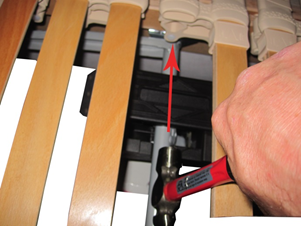
The mechanism shown is our heavy-duty adjustable bed mechanism for users over 18 stone but again the method is exactly the same as with our standard five-part adjustable bed mechanism. Lever out two slats directly above the drive bars that run through the motor unit, with a small hammer tap each of the covers in either direction and remove them.

Take the new motor and plug in the hand control. To prevent the connection being pulled out when the cable is pulled. Loop the cable and feed it through the bridge.


Lower the back section. Reach through the slats and increase the stack of books at the foot end of the motor so that the hook is now entering the motor.

To remove the old motor first position a box or books under each end of the motor so it will only drop down a short distance. A stack of approximately 5” (13cm) is about right. This is about the only thing Yellow Pages are useful for.
With the palm of your hand push down on the end of the motor and it should dropdown. If it is tight give it a little bang but it should not need a lot of force.

Bring the loop back around and loop it over the hook. Then pull back on the cable to lock it in place. Plug into the mains power supply. Ensure the drive rams are retracted by pressing the head and foot end buttons ‘Down’
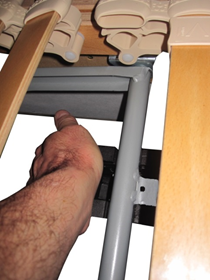
Manually lift the back section of the mechanism. It may stay up on it’s own but it is safer to ask someone to hold it while you pass the new motor back inside the mechanism on top of the boxes in line with the hooks on the drive bars. Make sure you have the motors the right way around. There is an illustration on the motor to indicate the head and foot ends.

Come to the head end and pull the motor body up sharply to engage it on the drive bar. This may need a good amount of force. Return to the foot end and pull the motor up to locate on the drive bar.
Slide the covers back on to the head and foot ends. You will notice they will only fit one way round. You may need to tap it across with a small hammer if it is stiff. If you are struggling to locate the cover in the slots of the motor body, it could be that the motor has not clicked into position on the drive bar. Simply give the motor another good yank to get it to locate and you should hear a click.Replace the slats.Plug in to the power supply. Feed the hand control up through the middle slats and test.
